- Open VBOX Video Setup.
- Go to Settings -> CAN in the top ribbon.

- Change the source to User Configurable, then select Load Database.

- Load the HDLITE_CAN.REF file (found as an attachment at the bottom of this article). You’ll now see channels CH0 to CH7 available for selection on the left-hand side of the screen.

- Open VBOX HD Lite Setup and load your configuration file (.RLC).
- Click CAN in the Views section of the ribbon.
- From left to right, top to bottom, the CAN channels you’ve selected will be CH0 to CH7.

- Go back to VBOX Video Setup and select the channels you want to use. Make sure that they match the positions from your .RLC file in VBOX HD Lite Setup.
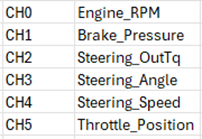
In our example, the channels were as follows:

- When you have allocated the required channels, click Settings -> Scene.
- Add an element (gauge or bar) for the relevant channels.
- Click on the element and select CAN to open the element settings on the right-hand side of the window.
- Set the Parameter to CAN, and choose the required channel from your VBOX HD Lite.
You can also set this option to GPS or Lap Timing to access other available channels in the .VBO file (logged by the VBOX HD Lite).

- When you have added elements with parameters for all your CAN channels, you can save a copy of your scene.
- Click the HD Overlay icon on the ribbon to process your selected .VBO file with your newly created scene.
This will create a video with a functioning graphical overlay for the selected parameters.