IMPORTANT
The functionality described on this page applies to the default Performance App.
Behaviour may differ if a different app is installed.
As the name suggests, Performance Box Touch is controlled by the capacitive touchscreen.
Generally, the different areas of the screen contain the following:
- Top bar – indicative status information
- Main area – mode and settings information
- Bottom bar – function buttons
The selected Display Mode name will be shown in the left corner of the header.
The Logging Status (recording icon) will indicate the recording status of Performance Box Touch. It will either appear when the unit is primed to log or when it is logging.

The Logging Status icon will appear white after you have initiated logging, but while the unit is primed for logging and in the process of synchronising the internal real-time clock (RTC) to GPS time.
The logging will not start until this synchronisation process has been completed.

The Logging Status icon will appear white after you have initiated logging, but while the unit is primed for logging and in the process of synchronising the internal real-time clock (RTC) to GPS time.
The logging will not start until this synchronisation process has been completed.

The Logging Status icon will become red to indicate that the unit is logging and saving data to the SD card.

The Logging Status icon will become red to indicate that the unit is logging and saving data to the SD card.
WARNING
Do not remove the SD card while the Logging Status Indicator is visible.
This indicates that the unit is actively logging and writing data to the SD card. Removing the card during this process may result in data loss or file corruption, and the SD card may need to be repaired before it can be used again.
Always confirm that logging has stopped before removing the SD card.
The Media Status (SD card icon) indicates the readiness status of the recording media.

The Media Status indicator will be green when Performance Box Touch has detected an SD card with available space.
Additionally, the Media Status indicator can function as a button. Tap on the green icon to manually start or stop the data logging (overriding the Configured Logging Strategy).

The Media Status indicator will be green when Performance Box Touch has detected an SD card with available space.
Additionally, the Media Status indicator can function as a button. Tap on the green icon to manually start or stop the data logging (overriding the Configured Logging Strategy).

The Media Status indicator will be red if Performance Box Touch cannot detect an SD card or when the detected card is full or corrupted.

The Media Status indicator will be red if Performance Box Touch cannot detect an SD card or when the detected card is full or corrupted.
The GNSS Status (satellite icon) indicates whether Performance Box Touch has a valid satellite lock.

A green GNSS Status indicates that a satellite lock is acquired.

A green GNSS Status indicates that a satellite lock is acquired.

A flashing red GNSS Status indicated that Performance Box Touch does not have satellite lock.

A flashing red GNSS Status indicated that Performance Box Touch does not have satellite lock.
If you are using the optional battery to power Performance Box Touch, the Battery status indicator will show the current battery charge.
If you are using the optional battery to power Performance Box Touch, the Battery status indicator will show the current battery charge.
Information that relates to the selected Display Mode will be displayed in the right-hand area of the screen header.

Tap on the Settings button to open the Select Settings screen, which contains menus for Display Mode settings, General settings, Date & Time settings, and Diagnostics.
The available Display Mode settings will depend on the selected Display Mode.

Tap on the Settings button to open the Select Settings screen, which contains menus for Display Mode settings, General settings, Date & Time settings, and Diagnostics.
The available Display Mode settings will depend on the selected Display Mode.
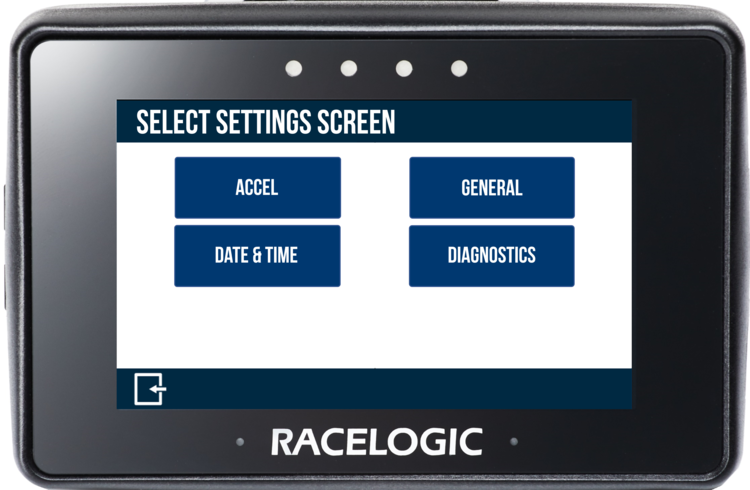
You can find more information about the different settings in the Available Settings section at the bottom of this page.

Tap the Screenshot button to save a full image of the current content on the screen.
The screenshot will be saved to the inserted SD card as a 1.5 MB bitmap image, oriented at 90° to the original screen image and with the prefix 'screenshot'.
The LEDs will become yellow, in sequence from left to right, to display the progress of saving the image to the SD card. Each LED represents 25% of the progress of the save.
When the screen capture is complete, Performance Box Touch will emit an audible confirmation notification.
If the screenshot could not be saved, for example, no SD card is inserted, or the card is full, the Media Status indicator in the header will flash 3 times, and Performance Box Touch will emit an audible error notification.
WARNING
NEVER remove the SD card while a screenshot is captured and saved as it could cause the unit to crash!

You can view the test results history by tapping the Results button in the footer of the current test screen.
Test results will be available in the results history until you choose a new test type or tap the Reset button.

You can view the test results history by tapping the Results button in the footer of the current test screen.
Test results will be available in the results history until you choose a new test type or tap the Reset button.
Up to 127 tests will be displayed in chronological order. If more tests have been completed, they will not be displayed in the on-screen results, but will still be recorded on the SD card.
Once the limit has been reached, Performance Box Touch will briefly display a warning message, advising that further tests will not be saved to the Test History.
A 'TEST HISTORY FULL' notification will also be shown below the Live Speed display.
The message will be displayed again each time the unit is power cycled until the test has been reset.
IMPORTANT
The on-screen Results have a limit of 127 tests.

When viewing the Result History for a test, you can save the results to the SD card by tapping the Save button.
The file format will be .txt or .csv (depending on the selected Results Save Format in the General Settings).
The file name will include the test type, the date and the time of the first completed run in that session. Along with the test history information (content depends on the test type), the results file also includes average acceleration information, and the latitude and longitude (in degrees and decimal degrees format) are added to the session header.
If saved successfully, the unit will emit an audible confirmation notification.
If Performance Box Touch cannot save the results, for example, if there is no SD card inserted or the SD card is full, the button will flash 3 times, and the unit will emit an audible error notification.

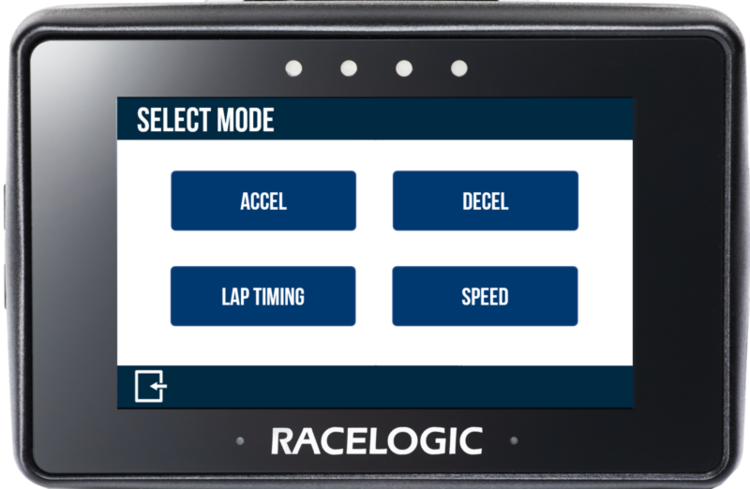
The Mode button lets you choose between the available Display Modes.

The Mode button lets you choose between the available Display Modes.

Depending on which screen you are on, the Reset button will reset mode results and/or history.
When selected, the LEDs will flash green twice, and the unit will emit an audible confirmation notification.
If you tap the Reset button while in Lap Timing mode, Performance Box Touch will display a cancel timeout screen, giving you the opportunity to cancel the reset within 5 seconds by tapping anywhere on the screen.


You can use the Navigation buttons to navigate through available screens in Display Modes and Settings.
When multiple screens are available, the navigation buttons will also become available.
Alternatively, swipe left or right on the screen to navigate between them.


You can use the Navigation buttons to navigate through available screens in Display Modes and Settings.
When multiple screens are available, the navigation buttons will also become available.
Alternatively, swipe left or right on the screen to navigate between them.

Tap the Exit button to return to the previous menu or page.

Tap the Exit button to return to the previous menu or page.
Performance Box Touch has 4 display modes: Accel, Decel, Lap Timing and Speed. The display modes allow you to conduct a range of performance tests and functions. You can change the display mode by tapping the Mode button in the screen footer.
Change the display mode to Accel by tapping Mode → Accel.
Use the acceleration displays to perform acceleration tests using pre-defined configurations. Alternatively, you can customise the accel tests with your own specified values.
The display can show up to 4 concurrent test results and test results displayed on the screen will remain until the next start condition is met.
Use Speed or Distance parameters to start and end the tests. The speed units used on the display depend on the selected option in the General Settings.
The previously selected acceleration test will be displayed after each power cycle.
NOTE
If the start condition is set to 0 km/h, VBOX Touch will use the Smoothed Speed Value to reset the test. This is to avoid a test being reset incorrectly in areas with noisy satellite reception.
Accel Mode Overview
There are 3 different acceleration screens:
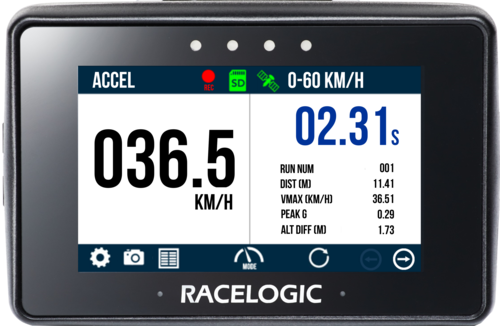
Primary Accel Screen
This is the default acceleration screen and it displays current/completed test information.
If One Foot Rollout or Slope Correction has been enabled in the Accel Settings, the test header text will reflect these options.
The primary Accel screen is split into two sections:
Left-Hand Side
This includes a live speed display which will always show the current speed of the vehicle, irrespective of any test start or end conditions. If the vehicle is travelling less than 0.5 km/h or the satellite lock is lost (less than 4 sats), the value will display as 000.0.
Right-Hand Side
This contains test information: time taken, run number, distance travelled, maximum speed achieved (Vmax), maximum acceleration achieved (g) and height difference. These values will start to populate once the start condition of the test is met. When the end condition is met, they will remain on screen until the start condition is met again. A test can be reset by pressing the Reset button at the bottom of the screen.
Secondary Accel Screen
This screen displays current test information for all ranges.
If One Foot Rollout or Slope Correction is enabled in the Accel Settings, the test header text will reflect the options.
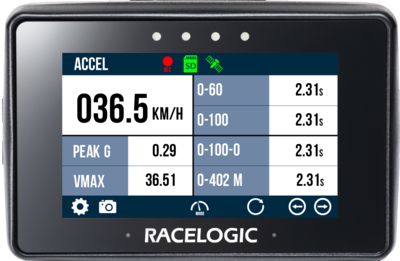
The secondary Accel screen is split into two sections:
Left-Hand Side
Includes a live speed display which will always show the current speed of the vehicle, irrespective of any test start or end conditions. If the vehicle is travelling less than 0.5 km/h or the satellite lock is lost (less than 4 sats), the value will display as 000.0.
Maximum acceleration achieved (Peak G) and maximum speed achieved (Vmax) information is also available.
These values will start to populate once the start condition of the Primary test is met.
When the end condition is met, they will remain on screen until the start condition is met again. Tap the Reset button at the bottom of the screen to reset a test manually.
Right-Hand Side
Contains results from the defined acceleration test ranges, either as time, distance or speed. These values will start to populate once the start condition of the test is met.
When the end condition is met, they will remain on screen until the start condition is met again. Tap the Reset button at the bottom of the screen to reset a test manually.
Double-tap on an existing test range header or result to open the Accel Settings and configure the acceleration test.
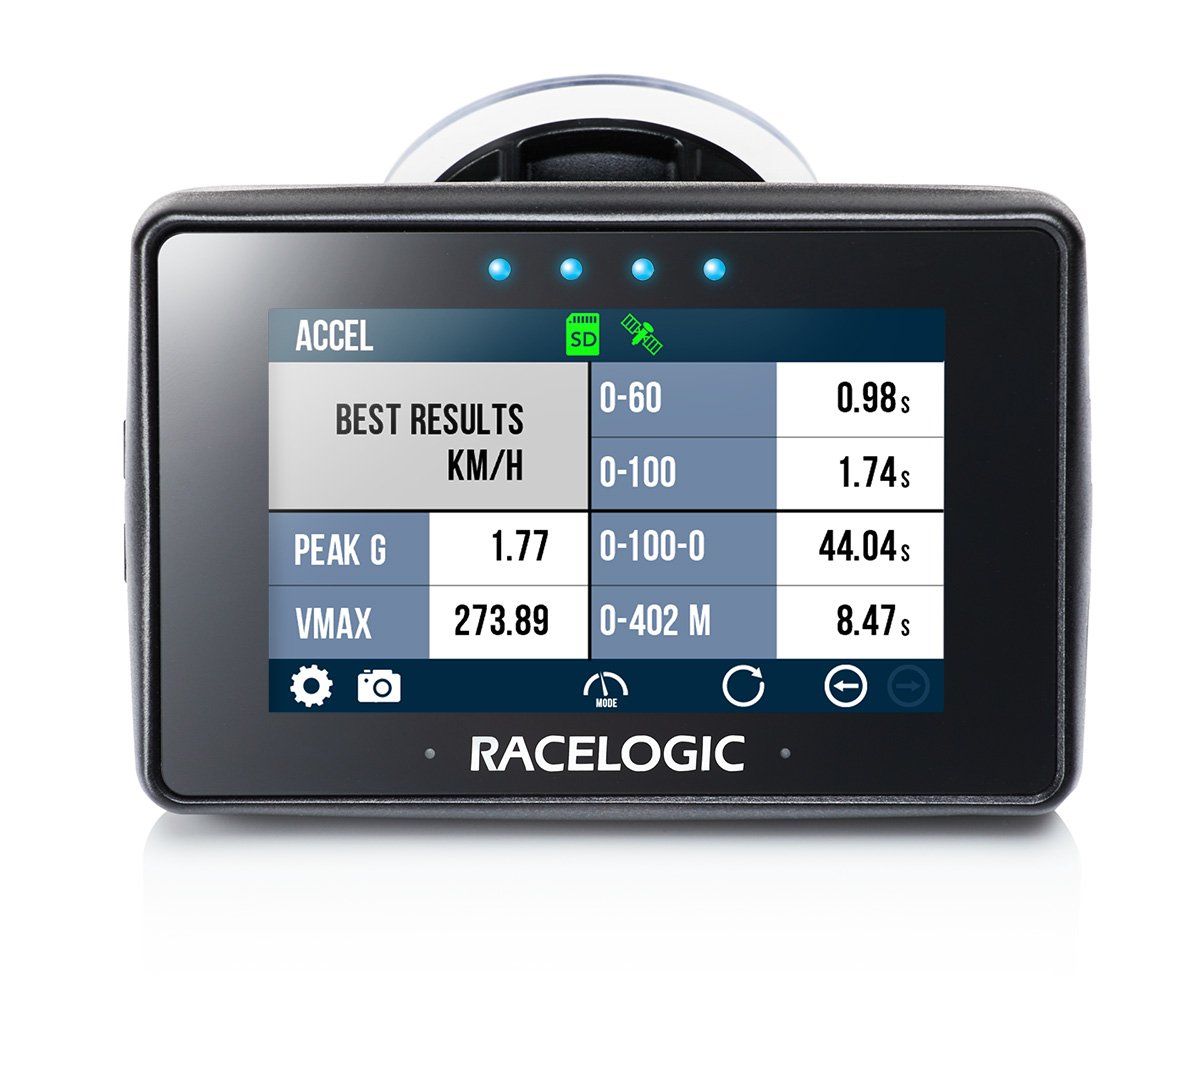
Best Results Screen
This screen displays the best test information for all ranges. If One Foot Rollout or Slope Correction is enabled in the Accel Settings, the test header text will reflect the options.
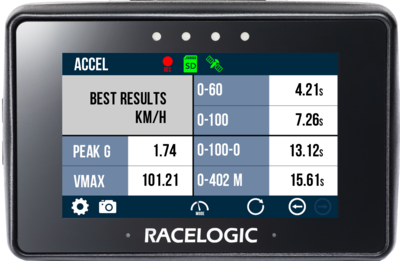
The Best Results Accel screen is split into two sections:
Left-Hand Side
This includes the maximum acceleration achieved (Peak G) and maximum speed achieved (Vmax) since reset.
Reset these values by tapping the Reset button at the bottom of the screen.
Right-Hand Side
This contains the best results from the defined acceleration test ranges, either as time, distance or speed.
Reset these values by tapping the Reset button at the bottom of the screen.
Test History
View a history of the test results by tapping the Results button at the bottom of the Primary Accel Screen.
Test results will remain in the history until a new test type is chosen or the test is reset using the Reset button.
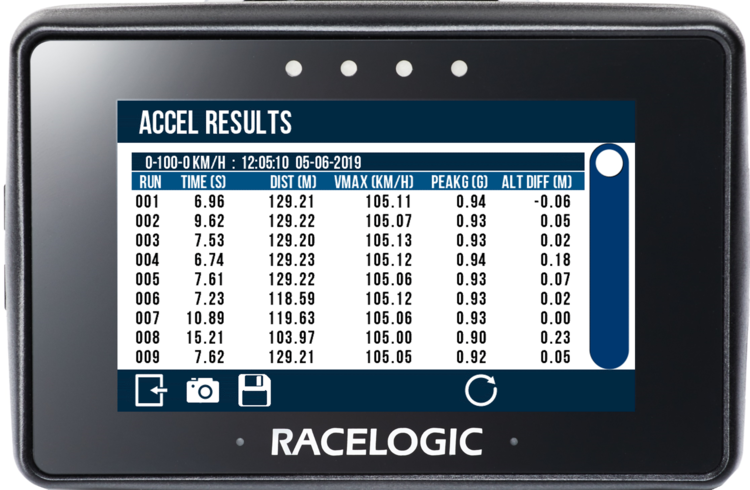
Tests will be displayed in chronological order, and the fastest will be highlighted in green. Use the scroll bar on the right-hand side of the screen to scroll through the results.
Each new session will have a separate header, displaying the time and date for the first completed test in that session.
Included information:
- Test type
- Time of first completed run in session
- Date of first completed run in session
- Test run number
- Test completion time
- Test completion distance (km/h or mph)
- Maximum speed achieved during a test run (km/h or mph)
- Maximum acceleration achieved during a test run (g)
- Altitude difference between the start of the test and the end of the test (m or ft)
Tap the Screenshot button to take a screenshot of the test history.
Tap the Exit button to return to the Primary Accel screen.
Change the display mode to Decel by tapping Mode → Decel.
Use the deceleration display to perform deceleration tests, using pre-defined configurations or your own specified values.
Test results displayed on the screen will remain until the next start condition is met.
Use Speed parameters to start and end the tests. The speed units on the display depend on the selected option in the General Settings.
The previously selected deceleration test will be displayed after each power cycle.
Decel Mode Overview
The Deceleration screen displays current and completed test information.
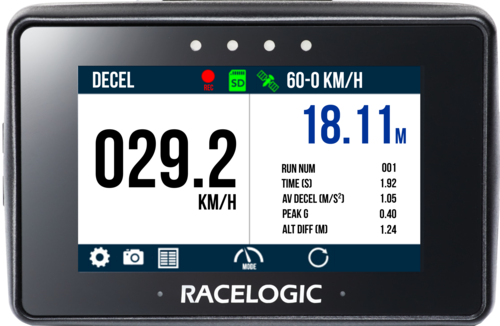
The screen is split into two sections:
Left-Hand Side
This includes a live speed display which always shows the current speed of the vehicle, irrespective of any start or end conditions set for testing. If the vehicle is travelling slower than 0.5 km/h or VBOX Touch loses the satellite lock (less than 4 satellites found), the value will be displayed as 000.0.
Right-Hand Side
This side contains test information: Distance travelled, run number, time taken, average deceleration achieved, maximum deceleration achieved (g) and height difference.
These values will populate once the start condition is met. When the end condition is met, they will remain on screen until the start condition is met again. You can reset a test by tapping the Reset button at the bottom of the screen.
Test History
View a history of the test results by tapping the Results button at the bottom of the screen.
Test results will remain in the history until a new test type is chosen or the test is reset using the Reset button.
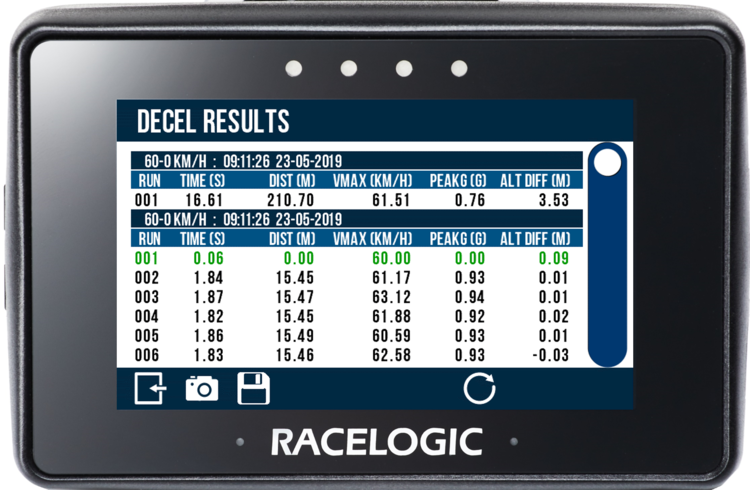
Tests will be displayed in chronological order, and the fastest will be highlighted. To scroll through the results, use the scroll bar on the right-hand side of the screen.
Each new session will have a separate header, displaying the time and date for the first completed test in that session.
Included Information:
- Test type
- Time of first completed run in session
- Date of first completed run in session
- Test run number
- Test completion time
- Test completion distance (km/h or mph)
- Average deceleration achieved during a test run (g)
- Maximum deceleration achieved during a test run (g)
- Altitude difference between the start of the test and the end of the test (m or ft)
Change the display mode to Lap Timing by tapping Mode → Lap Timing.
Use the Lap Timing display to view Lap Timing information in relation to a set Start/Finish line.
Test results displayed on the screen will remain until the next start condition is met.
The speed units on the display depend on the selected option in the General Settings.
The previously selected Lap Timing mode screen will be displayed after each power cycle.
Touch Shortcuts
| Screen Shortcut | Function |
|---|---|
| Swipe Left/Right | Accesses different lap timing or settings screens when available |
| Triple-tap on the Primary Lap Timing Screen | Fixes/Unfixes the reference lap |
| Press and hold on the Primary Lap Timing Screen | Resets the lap timing data, lap time history and reference lap |
| Tap on the Secondary Lap Timing Screen | Sets a Start/Finish or Finish Line at the current location |
Lap Timing Mode Overview
There are 2 Lap Timing display screens:
Lap Timing Mode - Primary Screen
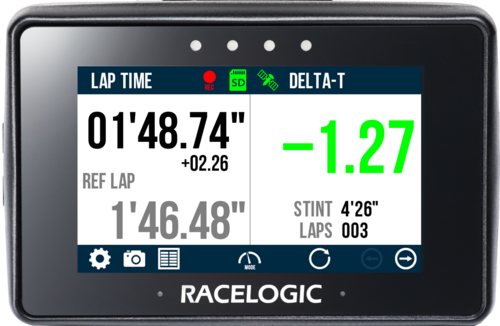
This is the default lap timing screen and it displays live lap timing information in relation to:
- A set Start/Finish line
- Separate Start and Finish lines
- A Standing Start line and separate Finish line
- A reference Lap
You can reset the data on the Primary Lap Timing screen by tapping the Reset button at the bottom of the screen, or by long-pressing on the screen.
The screen is split into two sections:
Left-Hand Side
- Lap time: This will show either a live rolling lap time or a static lap time (previous lap), depending on the Rolling Lap Time setting. If you want a rolling lap time displayed, the previous lap time will be displayed for 5 seconds when a new lap starts, before reverting back to displaying the current live lap time. If the Start/Finish line has yet to be crossed, the circuit name/layout will be displayed with a distance countdown to the Start/Finish line (if the unit has satellite lock). If you have enabled Standing Start, you will see a 'Standing Start Mode Enabled' message. If you have not defined a Start/Finish line or VBOX Touch cannot detect a Start/Finish line, you will see a 'No start line' warning.
- Time difference to best lap: This is the time difference between the last completed lap time and the quickest lap time. The data displayed is configured in the Rolling Lap Time settings. If Rolling Lap Time is disabled, the data will be displayed continuously. If Rolling Lap Time is enabled, the data will appear for 5 seconds after a lap has been completed. If the Start/Finish line has yet to be crossed or a lap hasn't been completed, it will not be displayed.
- Reference lap time: This is the current active reference lap time and it will update when the reference lap is superseded by a faster lap time, unless you have set fixed the Reference Lap in the Settings. If you have fixed a reference lap, you will see a padlock icon to the right of the reference lap heading. If a reference lap time is being created, you will see a rolling lap time.
Right-Hand Side:
- Delta-T: This presents a live difference in lap time at the current location on the track, between the current lap time and the reference lap. If the detected speed drops below 10 km/h or the satellite reception is lost (less than 4 satellites), the time comparison will freeze on the last known valid value until the speed is increased or the satellite reception is regained. If a reference lap is being created, you will see a 'Creating a Reference Lap' message.
- If the current lap is faster than the reference lap, the value will be signed negative and be green in colour.
- If the current lap is slower than the reference lap, the value will be signed positive and be red in colour.
- If the current lap is the same as the reference lap, the value will be unsigned and be black in colour.
- Session time: Total time passed within the session.
- Completed lap count: Number of completed laps within the session.
OR
- Delta-V: When there is a reference lap, the 4 LEDs at the top of the screen will provide a live reference lap speed comparison at the current location on the track. You can configure this in the Delta-V Range settings.
- If the current lap is faster than the reference lap, the LEDs will be illuminated in green.
- If the current lap is slower than the reference lap, the LEDs will be illuminated in red.
- If the current lap is the same speed as the reference lap, the LEDs will be off.
IMPORTANT
Lap timing gates are bi-directional and will be triggered when passing through in either direction.
Lap Timing Mode - Secondary Screen
This lap timing screen displays a lap time in relation to:
- A set Start/Finish Line
- Separate Start and Finish Lines
- A Standing Start line and separate Finish Line
- A reference Lap
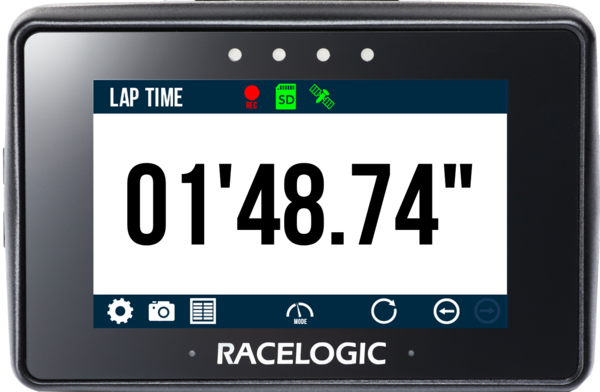
Lap Time
This will show either a live rolling lap time or a static lap time (for the previous lap), depending on the Rolling Lap Time settings.
If a rolling lap time is being displayed, the previous lap time will be displayed for 5 seconds when a new lap starts, before it reverts back to displaying the current live lap time.
If the Start/Finish line has yet to be crossed, the circuit name/layout will be displayed with a distance countdown to the Start/Finish line (if the unit has satellite lock).
If you have enabled Standing Start, you will see a 'Standing Start Mode Enabled' message.
If you have not defined a Start/Finish line or VBOX Touch cannot detect one, you will see a 'No start line' warning.
Time Difference to Best Lap
This is the time difference between the last completed lap time and the quickest lap time, and it is displayed depending on the Rolling Lap Time settings.
It will either display continuously if you have set the Lap Timing screen to display a static lap time, or will appear for 5 seconds after a lap has been completed if you have set it to display a rolling lap time.
If the Start/Finish line has yet to be crossed or a lap hasn't been completed, this data will not be shown.
Lap History
View a history of the lap results by selecting the Results button at the bottom of the screen.
The Lap results will remain in the history until you press the Reset button.
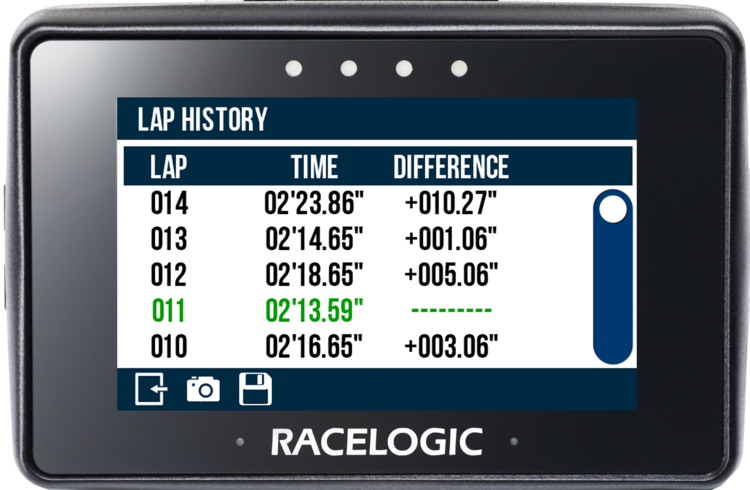
The most recently completed lap will show at the top of the screen and the fastest lap will be highlighted. Use the scroll bar on the right-hand side of the screen to scroll through the history.
Included information:
- Lap number
- Lap time
- Time difference from the fastest lap
Change the display mode to Speed by tapping Mode → Speed.
Use the speed display to view live speed data. There are 3 different Speed screens:
- Speed
- VMAX
- Average Speed.
The speed units on the display depend on the selected option in the General Settings.
The previously selected speed mode screen will be displayed after each power cycle.
Speed Display Mode Overview
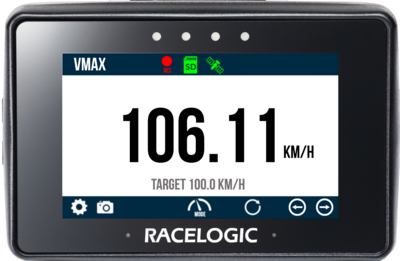
Speed Display Mode - Speed Screen
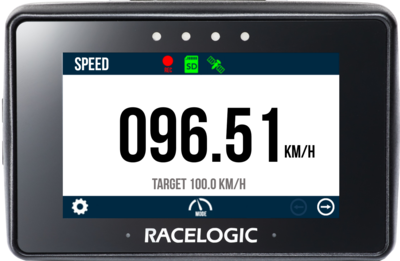
This is the default speed screen and it displays live speed data.
If you have selected a Target Speed in the Speed Settings, it will be displayed in grey underneath the live speed.
NOTE
If the vehicle is travelling slower than 0.5 km/h or if Performance Box Touch has lost its satellite lock (fewer than 4 satellites), the speed value will be shown as 000.0.
Speed Display Mode - VMAX Screen
This screen displays the absolute top speed reached until you tap the Reset button in the screen footer.
If you have set a Target Speed in the Speed Settings, it will be displayed in grey underneath the VMAX value.
Speed Display Mode - Average/Distance Screen
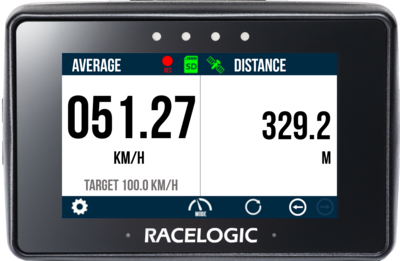
This screen is split into two sections:
Left-Hand Side
The average speed, displayed using either continuous or moving calculations.
Right-Hand Side
The distance travelled (since the last boot-up or power cycle).
The two data sets are displayed on the same screen when Performance Box Touch detects movement.
Reset the screen at any time by tapping the Reset button at the bottom of the screen.
If you have set a Target Speed in the Speed Settings, it will be displayed in grey underneath the average speed.
Performance Box Touch has 4 LEDs at the top of the unit, just above the screen. These LEDs provide visual status and/or test feedback.
Some behaviours will indicate different things depending on the mode/function the unit is performing.

If Alert at End is enabled, the LEDs will flash green for 0.5 s once the test end criteria are met.

If Alert at End is enabled, the LEDs will flash green for 0.5 s once the test end criteria are met.
In Lap Timing Mode, the LEDs provide an indication of the speed compared to the Reference Lap speed (Delta-V).
You can adjust the Delta-V Range in the Lap Timing Settings to change the LED behaviour in relation to the Delta-V speed.
There are 3 options:
- 2 km/h (1.2 mph)
- 5 km/h (3.1 mph) - default
- 10 km/h (6.2 mph)
These relate to the maximum speed difference at which the LEDs are brightest.
When the current lap is quicker than the reference lap by > than the set Delta-V Range, all 4 LEDs will be illuminated in green.
For example, when Delta-V Range = 5 km/h:
When VBOX Touch detects that the current lap is more than 5 km/h faster than the Reference Lap.
When the current lap is quicker than the reference lap by > than the set Delta-V Range, all 4 LEDs will be illuminated in green.
For example, when Delta-V Range = 5 km/h:
When VBOX Touch detects that the current lap is more than 5 km/h faster than the Reference Lap.

When the current lap is quicker than the reference lap by 50% of the set Delta-V Range, all 4 LEDs will be partially illuminated in green.
For example, when Delta-V Range = 5 km/h:
When VBOX Touch detects that the current lap is between 2.5 km/h and 5 km/h faster than the Reference Lap.

When the current lap is quicker than the reference lap by 50% of the set Delta-V Range, all 4 LEDs will be partially illuminated in green.
For example, when Delta-V Range = 5 km/h:
When VBOX Touch detects that the current lap is between 2.5 km/h and 5 km/h faster than the Reference Lap.

When the current lap is matching the speed of the Reference Lap, all 4 LEDs will be off.

When the current lap is matching the speed of the Reference Lap, all 4 LEDs will be off.

When the current lap is slower than the Reference Lap by 50% of the set Delta-V Range, all 4 LEDs will be partially illuminated in red.
For example, when Delta-V Range = 5 km/h:
When VBOX Touch detects that the current lap is between 2.5 km/h and 5 km/h slower than the Reference Lap.

When the current lap is slower than the Reference Lap by 50% of the set Delta-V Range, all 4 LEDs will be partially illuminated in red.
For example, when Delta-V Range = 5 km/h:
When VBOX Touch detects that the current lap is between 2.5 km/h and 5 km/h slower than the Reference Lap.

When the current lap is slower than the reference lap by > than the set Delta-V Range, all 4 LEDs will be illuminated in red.
For example, when Delta-V Range = 5 km/h:
When VBOX Touch detects that the current lap is more than 5 km/h slower than the Reference Lap.

When the current lap is slower than the reference lap by > than the set Delta-V Range, all 4 LEDs will be illuminated in red.
For example, when Delta-V Range = 5 km/h:
When VBOX Touch detects that the current lap is more than 5 km/h slower than the Reference Lap.
In addition to the Delta-V behaviour, the LEDs can indicate the following:

When VBOX Touch is in the process of creating a Reference Lap, the LEDs are illuminated in blue.

When VBOX Touch is in the process of creating a Reference Lap, the LEDs are illuminated in blue.

When loading a Track Database file, the LEDs will illuminate in yellow, in sequence from left to right, to display the progress of updating the track database.
Each LED will illuminate in yellow to represent 25% of the process being completed.
When all the LEDs have been illuminated and extinguished again, the file has been loaded and the database has been updated successfully.
When the following settings are changed, the LEDs will flash green twice:
- When a Track Layout is changed.
- When a Finish Line is cleared.
- When a Standing Start is Enabled or Disabled.
When the following settings are changed, the LEDs will flash green twice:
- When a Track Layout is changed.
- When a Finish Line is cleared.
- When a Standing Start is Enabled or Disabled.
If a Target Speed LED Alert has been set, the LEDs will flash green when the unit detects that the target speed has been met.
If a Target Speed LED Alert has been set, the LEDs will flash green when the unit detects that the target speed has been met.
When a screenshot is being captured and saved, the LEDs will illuminate in yellow, in sequence from left to right, to display the progress of writing to the SD card.
Each LED will illuminate in yellow to represent 25% of the process being completed.
When all the LEDs have been illuminated and extinguished again, the file has been saved successfully.
When you have initiated a reset, the LEDs will flash green twice when the reset has been completed.
When you have initiated a reset, the LEDs will flash green twice when the reset has been completed.
If the battery has run out of charge, the LEDs will flash red five times before the unit turns off.
If the battery has run out of charge, the LEDs will flash red five times before the unit turns off.