
The Tyre Temperature App is to be used as part of the Tyre Temperature Monitoring System (TTMS) with the Racelogic Tyre Temperature Sensor Kit (RLACS272).
The app has a real-time display of the temperature across the width of each tyre. It also displays the current speed and the Vmax speed.
It provides immediate insight into what is happening to your tyres on the track. This is invaluable information when you are setting up the optimum brake bias and tyre setup before a race.
On the responsive colour display, you will see a visual representation with 64 individual heat maps and live and maximum temperature values.
Download the app from the VBOX Motorsport website.
For installation instructions, refer to the Installing or Updating an App article.
Compatible Products (Product Code):
VBTOUCH
VBTOUCHR
Version 1.1.4.51 - 14 March 2024
NEW FEATURES & FUNCTIONALITY
- Offers support for new hardware variants.
Version 1.1.3.45 - 15 August 2022
NEW FEATURES & FUNCTIONALITY
- Offers support for VBOX Touch V2, 25 Hz
Version 1.1.2.44 - 17 March 2022
NEW FEATURES & FUNCTIONALITY
- Speed and VMAX parameters have been added to the TTM main screen.
- Prevent VMAX from resetting to zero after power cycle.
- VMAX no longer resets when speed = 0.
- Font colour for live values corrected to black.
- Grey heat blocks display when no CAN detected.
BUG FIXES & IMPROVEMENTS
- Default settings no longer flash up when accessing the sensor settings screen.
Version 1.1.1.41 - 8 July 2021
NEW FEATURES & FUNCTIONALITY
- Support for new hardware, the VBOX Touch RTK (VBTOUCHR)
BUG FIXES & IMPROVEMENTS
- Changed -0 to 0 when temperature is set to °C
- Blue line on the right side of the app has been removed
Version 1.1.1.23 - November 2020
- Initial release

The sensor display has been split into four areas representing each tyre; front left tyre (top left), front right tyre (top right), rear left tyre (bottom left), and rear right tyre (bottom right).
For each tyre, available information includes a visual heat block temperature representation, live temperature, and maximum temperature achieved.
You will also see the current vehicle speed and the VMAX speed displayed in the middle of the sensor display.
The VMAX value is saved and will be displayed again next time the unit is powered on. Reset the VMAX value to the current speed value by tapping the Reset button in the footer.
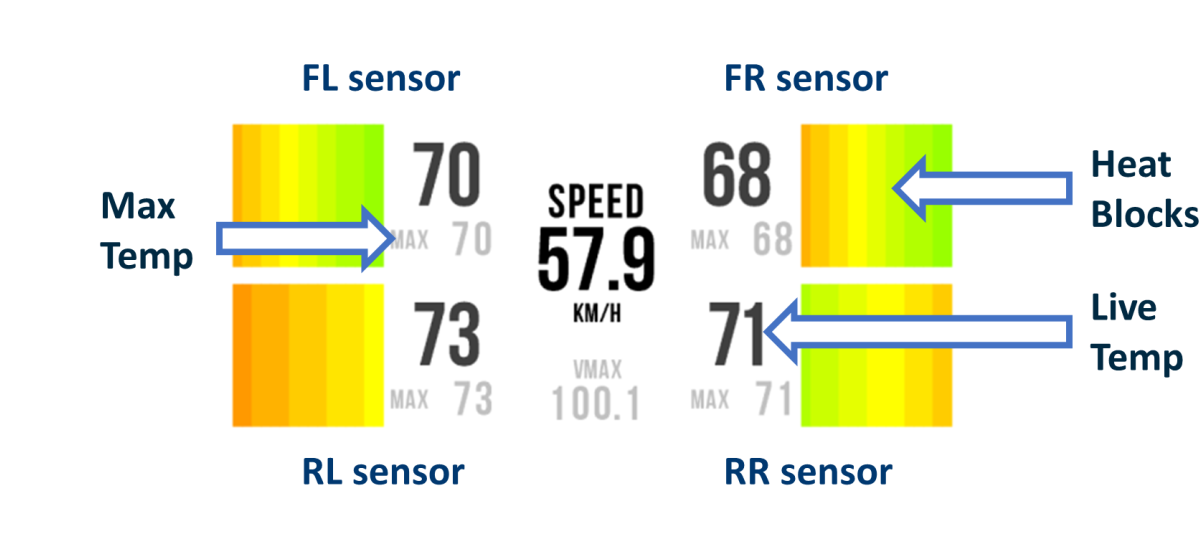
Each sensor measures 16 temperature points across the tyre surface, displayed as heat blocks on the main screen.
The heat blocks change colour based on temperature, blending between blue, green, yellow, and red, where blue represents the lowest temperatures and red represents the highest temperatures.
If the heat blocks appear greyed out, VBOX Touch is not detecting a CAN connection.
You can see a live temperature value in numerical form for each sensor displayed on the Sensor Display. Each displayed temperature value is an average of the 4 most central temperature channels for that particular sensor.
If the sensor does not receive a temperature reading, '--' will be displayed.
The app will store the highest measured temperature from each sensor and display them on the Sensor Display.
Until the app receives a temperature reading, you will see "--" displayed in its place.
The app will remember the max temperature values after a power cycle, but you can reset them by tapping the Reset button in the footer of the Sensor Display.
NOTE
Maximum temperature values are displayed in grey to distinguish them from live readings.

Open the Tyre Temperature App Settings by tapping the Settings button in the Sensor Display footer.

Open the Tyre Temperature App Settings by tapping the Settings button in the Sensor Display footer.

Tap the Reset button in the Sensor Display footer to reset all saved maximum values.

Tap the Reset button in the Sensor Display footer to reset all saved maximum values.

Tap the Screenshot button to save an image of the current screen.
The image file will be saved to the SD card inserted in the display unit.
The LEDs will illuminate yellow in sequence from left to right to indicate the progress of writing to the SD card, and the display unit will emit an audible confirmation notification when the screen capture is complete.
If the display was unsuccessful in saving the screenshot (no SD card available or the card was full), it will display a 'NO SD CARD' message at the top of the screen, the LEDs will flash red twice, and it will emit an audible error notification.
Screenshots are saved as 1.5 MB bitmap images, oriented 90° from the original screen image, with the prefix 'screenshot'.
IMPORTANT
Do not remove the SD card while a screenshot is being captured. Doing so may cause the unit to crash.


When available, use the Forward and Back buttons in the bottom right corner to navigate through the relevant screens.
Alternatively, you can swipe left or right on the screen.


When available, use the Forward and Back buttons in the bottom right corner to navigate through the relevant screens.
Alternatively, you can swipe left or right on the screen.

When available, tap the Exit button to leave the current screen and go back to the previous screen.

When available, tap the Exit button to leave the current screen and go back to the previous screen.
The GNSS Status (satellite icon) shows whether the VBOX Touch is tracking enough satellites for a reliable position fix.

A green GNSS Status indicates that a satellite lock is acquired.

A green GNSS Status indicates that a satellite lock is acquired.

A flashing red GNSS Status indicated that VBOX Touch does not have satellite lock.

A flashing red GNSS Status indicated that VBOX Touch does not have satellite lock.
The CAN Data Status indicates whether the VBOX Touch is receiving data from the temperature sensors.

When VBOX Touch detects transmitted CAN data, the CAN Data Status Indicator will be green and the temperature values and the heat blocks on the Sensor Display will appear as normal.

When VBOX Touch detects transmitted CAN data, the CAN Data Status Indicator will be green and the temperature values and the heat blocks on the Sensor Display will appear as normal.

If VBOX Touch cannot detect any CAN data, the CAN Data Status Indicator will be red, heat blocks in the Sensor Display will be greyed out and the temperature values will display as "--".

If VBOX Touch cannot detect any CAN data, the CAN Data Status Indicator will be red, heat blocks in the Sensor Display will be greyed out and the temperature values will display as "--".
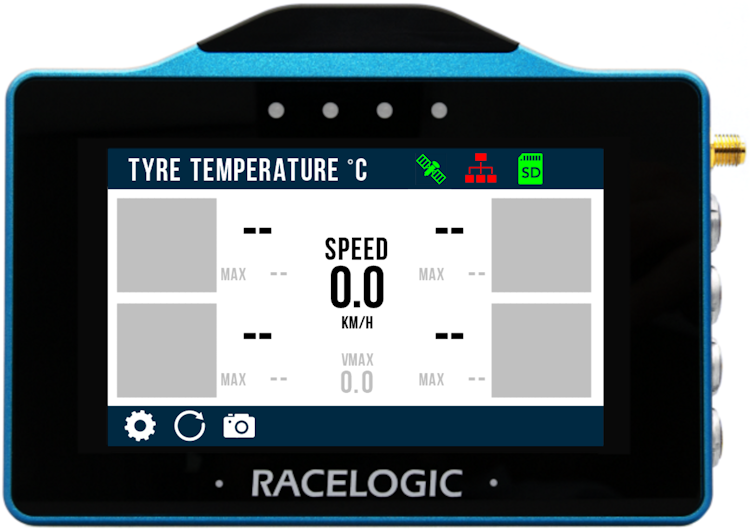
The Media Status (SD card icon) shows whether the SD card is ready for recording.

The indicator will be green when VBOX Touch detects an inserted SD card with sufficient available storage space.
Tap the icon when it is green to manually start or stop the data logging and override the configured Logging strategy in the General Settings.

The indicator will be green when VBOX Touch detects an inserted SD card with sufficient available storage space.
Tap the icon when it is green to manually start or stop the data logging and override the configured Logging strategy in the General Settings.

The indicator will be red if VBOX Touch cannot detect an inserted SD card or if the media is full or corrupted.

The indicator will be red if VBOX Touch cannot detect an inserted SD card or if the media is full or corrupted.
The Logging Status (recording icon) shows whether the unit is recording data or ready to log but temporarily busy.

The indicator will be red when VBOX Touch is logging and saving data to the SD card.

The indicator will be red when VBOX Touch is logging and saving data to the SD card.

When initiating logging, the indicator will become white if VBOX Touch is in the process of synchronising the internal real-time clock (RTC) to GPS time.
VBOX Touch has been primed for logging, and the logging will start when the synchronisation process has been completed.

When initiating logging, the indicator will become white if VBOX Touch is in the process of synchronising the internal real-time clock (RTC) to GPS time.
VBOX Touch has been primed for logging, and the logging will start when the synchronisation process has been completed.
CAUTION
Do not remove the SD card while the Logging Status Indicator is visible on the VBOX Touch screen.
This indicates that the unit is actively logging and writing data to the SD card. Removing the card during this process may result in data loss or file corruption, and the SD card may need to be repaired before it can be used again.
Always confirm that logging has stopped before removing the SD card.
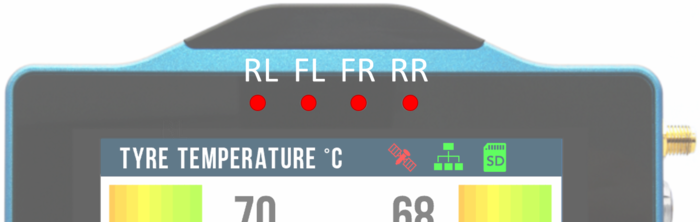
The four LEDs at the top of the unit provide visual feedback based on the current operation of the VBOX Touch
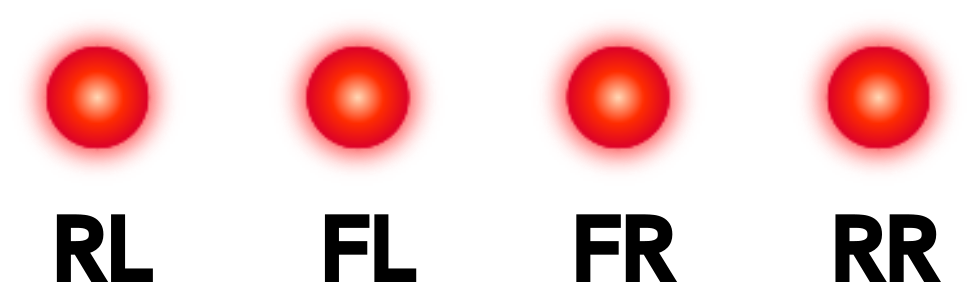
The LEDs are mapped to the sensors and indicate if one or more tyres are overheating.
Each LED corresponds to a tyre position: RL (rear left), FL (front left), FR (front right), and RR (rear right).
If any temperature sensor records a value above the configured Overheat Temperature (set in the Temperature Settings), the corresponding LED illuminates red.
The LED remains red until the temperature on that tyre has stayed below the overheat threshold for at least 1 second.

When a screenshot is being captured and saved, the LEDs will illuminate yellow in sequence from left to right to indicate progress while writing to the SD card.
Each LED represents 25% of the save process.
Once all four LEDs have illuminated and then turned off again, the screenshot has been saved successfully.
Tap on the Settings button in the left corner of the Sensor Display footer to open the Tyre Temperature App Settings.
The following settings screens are available:
- Temperature Settings
- Sensor Settings
- General Settings
- Diagnostics
Use the navigation buttons or swipe left/right on the screen to move between the different setting screens.
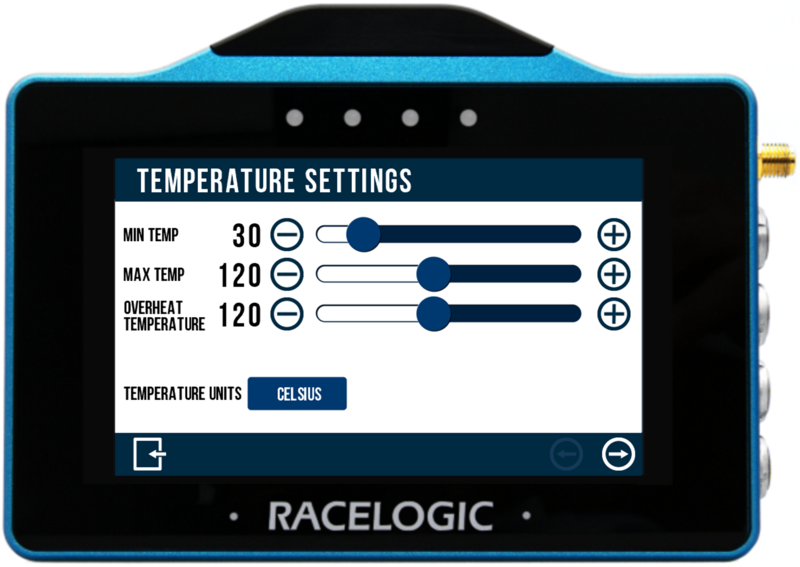
Use the Temperature Settings to adjust the temperature thresholds for your test.
Each setting includes a slider. You can change the value by dragging the blue circle left or right, or by using the + and – buttons to make more precise adjustments.
This setting defines the minimum temperature value for the heat blocks.
Any temperature reading below this value will be displayed in blue.
For example, if the minimum temperature is set to 30°C, any reading below 30°C will appear blue.
This setting defines the maximum temperature value for the heat blocks.
Any temperature reading above this value will be displayed in red.
For example, if the maximum temperature is set to 120°C, any reading above 120°C will appear red.
This setting defines the temperature threshold that activates the overheat LEDs.
When a tyre exceeds this temperature, the corresponding LED illuminates red and remains on until the temperature has stayed below the threshold for at least 1 second.
Each LED represents a tyre position, as defined below.
This setting defines the temperature unit used in the app. Choose between Celsius and Fahrenheit.
All temperature values on the Temperature Settings screen and the Sensor Display will automatically convert to match the selected unit.
Tap the button showing the current unit to toggle between the two options.
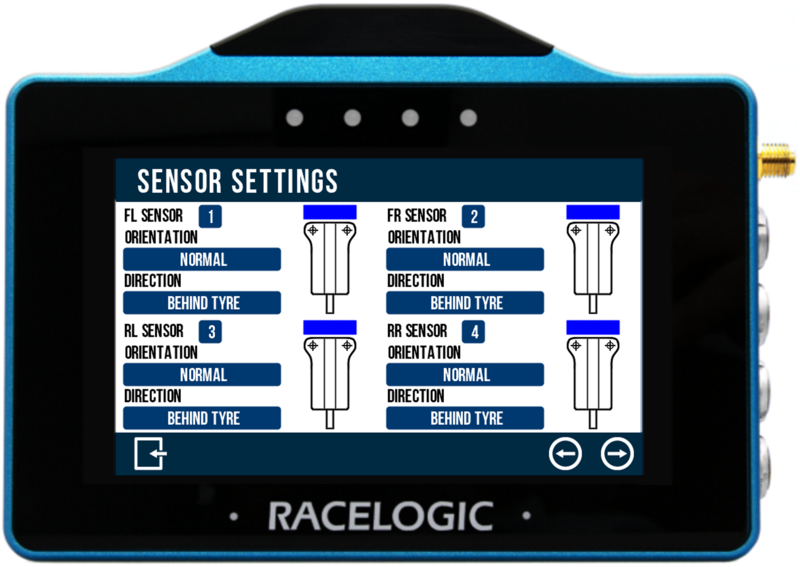
Use the Sensor Settings to configure the connected Tyre Temperature Sensors.
You can change a setting by tapping the corresponding button next to each option. The button displays the currently selected option.
This setting allows you to match each sensor to a tyre position (FL, FR, RL, RR).
This is useful if sensors have been installed in different positions from the default, as it allows you to correct the layout without physically moving them.
To change the sensor for a tyre position, tap the number button to cycle through sensors 1, 2, 3, and 4 until the correct sensor is shown.
This setting allows you to adjust for how the sensors are mounted on the vehicle.
Normal orientation is when the sensor is mounted on top of the chassis, with the mounting surface facing down.
Upside down orientation is when the sensor is mounted underneath the chassis, with the mounting surface facing up.
You must select the correct orientation to ensure the heat blocks are displayed in the correct order on the Sensor Display.
Tap the button showing the current orientation to toggle between the two options.
The on-screen sensor image will update to reflect the selected orientation.
This setting allows you to match the sensor direction to how the sensors are mounted on the vehicle.
Sensors can be mounted either in front of or behind the tyre. The selected direction must match the physical position to ensure the heat blocks are displayed in the correct order on the Sensor Display.
Tap the button showing the current direction to toggle between the two options.
The sensor and heat blocks swap position to reflect the selected direction.
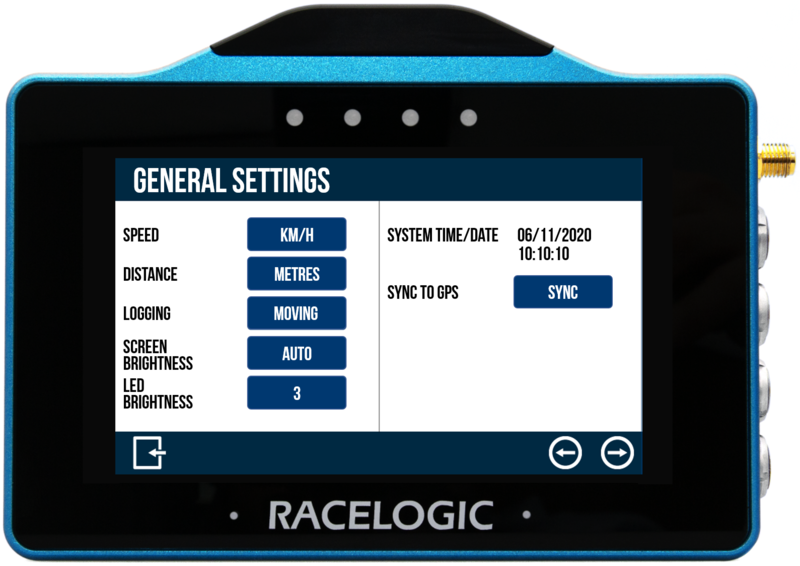
Use the General Settings to configure the VBOX Touch unit.
You can change a setting by tapping the corresponding button next to each option. The button displays the currently selected option.
This setting allows you to choose the speed unit used in the app. Select between km/h (default) and mph.
All displayed and logged speed values are automatically converted to match the selected unit, and the unit labels update accordingly.
Tap the button showing the current unit to toggle between the two options.
This setting allows you to choose the distance unit used in the app. Select between metres (default) and feet.
All displayed and logged distance values are automatically converted to match the selected unit, and the unit labels will update accordingly.
Tap the button showing the current unit to toggle between the two options.
This setting defines how data logging starts and stops on VBOX Touch.
Moving (default)
Logging starts when an SD card is inserted and the VBOX Touch detects a vehicle speed that exceeds 0.5 km
The logging will pause if the detected speed remains below 0.5 km/h for 3 seconds, and resume when it exceeds 0.5 km/h again.
Continuous
Logging starts automatically when an SD card is inserted and initialised.
Tap the button with the current mode to toggle between the two options.
NOTES
- You can start and stop logging manually by tapping the Media Status Indicator (when it is green), which overrides the selected logging mode.
- A new data file is created each time logging is started. Data is not appended to an existing file.
This setting allows you to adjust the screen brightness on VBOX Touch.
You can choose between five brightness levels, where 1 is the dimmest and 5 is the brightest.
You can also select Auto, which uses the internal ambient light sensor to adjust the brightness automatically. The screen will dim in low-light conditions and brighten in brighter conditions.
Tap the button with the current brightness level to cycle through the available options.
This setting allows you to adjust the LED brightness.
You can choose between five brightness levels, where 1 is the dimmest and 5 is the brightest. You can also turn the LEDs off completely.
Tap the the button with the current brightness level to cycle through the available options.
The LEDs will preview each brightness level as it is selected.
CAUTION
LED brightness level 5 is very bright and may cause glare or discomfort in low-light conditions.
This section displays the current time and date used by the system.
This feature synchronises the internal real-time clock (RTC) with GPS time.
For synchronisation to take place, the following conditions must be met:
- GPS time is available
- The unit is not moving
- The unit is not logging
If GPS time is not available, a red satellite icon is displayed next to the button.
Tap the Sync button to start the time synchronisation process.
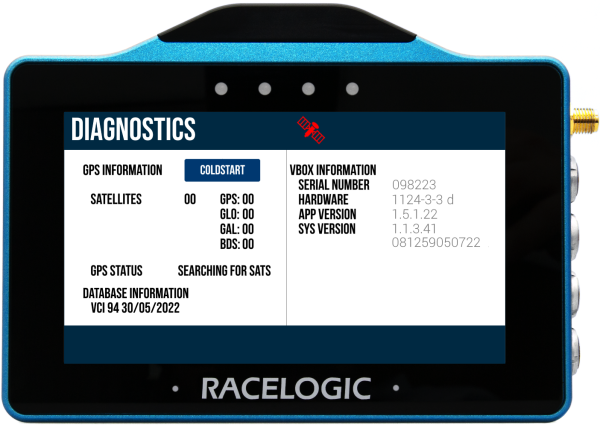
This screen displays basic GPS receiver and VBOX information.
The Coldstart feature is included in the GPS Information section. Tap the Coldstart button to trigger a coldstart if VBOX Touch cannot acquire satellite lock.
For more details about the information shown on this screen, refer to the VBOX Touch User Guide.
The Tyre Temperature App provides a real-time visual overview of tyre temperature data from the connected Tyre Temperature Sensors.
During operation, use the heat blocks to monitor temperature distribution across each tyre. The colour range from blue (cool) to red (hot) allows you to quickly identify uneven heating or potential overheat conditions.
The LED indicators provide immediate visual feedback for key events, such as overheat warnings and screenshot captures.
Ensure that the displayed sensor positions (FL, FR, RL, RR) match the physical installation on the vehicle, as incorrect configuration may result in misleading data.
The satellite icon indicates GNSS status and should show a valid lock before relying on logged data or time synchronisation.
The Tyre Temperature App logs a standard .vbo data file containing all standard GPS parameters, along with 16 CAN parameters from each sensor (64 in total).