This page contains an introduction and overview of the Racelogic VBOX Touch product range and what you need to know before you start using it.
Perform almost any type of vehicle test with this rugged and user friendly data logger:
- Touch screen
- In-built applications
- Speedometer and data logging functionality
- Additional VBOX Touch Apps for extended testing capabilities
IMPORTANT
The functionality described in this user guide assumes the default Performance App is installed.
Register your Racelogic product so that we can provide you with notifications about the latest software and firmware releases, and offer technical support.
When you purchase a VBOX Touch Motorsport (RLVBTOUCH-M), you will find the following items when you open the box:
| Product Code | Quantity | Description | ||
|---|---|---|---|---|
| VBTOUCH-V2/V3 | 1 | VBOX Touch unit | ||
| MECH0298SD | 1 | Protective Rubber Case – Black | ||
| RLCAB014LE | 1 | Unterminated Power Cable - 2m (Lemo 2-way to 2-wire unterminated) | ||
| RLACS313 | 1 | 8 GB SD Ultima Pro UHS-1 Memory Card | ||
| RLACS262 | 1 | GNSS Antenna with SMA connector (3 m) | ||
| RLACS331 | 1 | Swivel Neck Richter Suction Mount | ||
| Product Code | Description |
|---|---|
| RLVBACS004 | Brake Pedal Trigger |
| RLVBACS010 | Hand Held Start/Stop Logging Switch |
| RLCAB001 | VBOX PC Serial Cable |
Refer to the VBOX Touch Knowledge Base for more information about required connections and configurations when using optional accessories with VBOX Touch.
VBOX Touch is supplied ready to use with the default Performance App installed. This app provides the core functionality of the unit, including logging, display modes, and test features described in this user guide.
It is possible to install different apps on VBOX Touch to support different testing requirements. If a different app is installed, the behaviour of the unit—including available features and CAN output—may change.
The functionality described in this user guide applies to the default Performance App. App-specific functionality for other VBOX Touch Apps is documented in the VBOX Touch Apps section.
To restore the default Performance App, reinstall the latest VBOX Touch firmware.
The unit includes an internal antenna, which may be sufficient in open environments. However, for reliable and repeatable results, especially when used inside a vehicle, the external antenna is recommended.
Connect the GNSS antenna to the unit and place it with a clear view of the sky. Avoid placing the antenna under metal surfaces, as this can significantly reduce signal quality.
You can find more information about best practices in the GNSS Antenna Placement article.
IMPORTANT
During first use, it may take up to 10–15 minutes to fully acquire satellites. After this, it usually takes 1–2 minutes to acquire satellites.
VBOX Touch records all data to an SD card inserted into the side of the unit. If the unit cannot detect an SD card, logging will not be available.
It comes supplied with an 8 GB SDHC card in a FAT32 file format, which is the only file format supported.
If you are looking to purchase a new SD card, we recommend that any card used has a write speed of more than 7 MB/s (4 MB/s is the absolute minimum) and a speed class of 10 (4 is the absolute minimum). Use SD cards from quality brands such as Transcend, SanDisk, Kingston or Lexar for best results.
SDHC cards (2 GB to 32 GB)
Supplied or purchased SDHC cards are formatted in the FAT32 file format. This format is supported by VBOX Touch.
SDXC cards (64 GB and above)
Purchased SDXC cards will be formatted in exFAT or NTFS file formats; these formats are not supported by VBOX Touch (please reformat as per instructions below).
IMPORTANT
If an SD card is formatted in the exFAT or NTFS file formats, it will need to be reformatted into a FAT32 file system before it will work with VBOX Touch.
FAT32 reformatting for media with sizes up to 32 GB can be done directly within Windows by right-clicking on the media and selecting 'Format'.
If you would like to format media with sizes above 32 GB into a FAT32 file system, this cannot be done directly in Windows as it is not the standard formatting for the file. However, many third-party software programs can be used to reformat media to allow them to work correctly with our products. We can recommend This Tool as a free option from the SD card organisation.
VBOX Touch is supplied with an unterminated power cable (RLCAB014LE), to allow bare-wire connection to a power supply. The other end of the cable terminates in a 2-way Lemo connector that connects to the Power connector on VBOX Touch.
The unit will automatically power on when connected to power.
While the unit is starting, it will display the following splash screen:
On start-up, the unit:
- Searches for satellites.
- Detects the SD card.
- Prepares for logging.
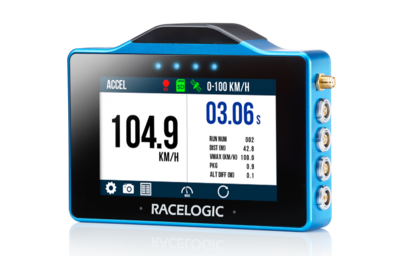
Mode Selection
The very first time the unit is started, it will present the Select Mode screen where you can select the required Display Mode. After this, it will automatically display the last used display mode when on power-up.
The unit supports multiple display modes, each designed for a specific type of test, such as speed, acceleration, deceleration, or lap timing.
Refer to the Display Modes section under User Interface for more information.
By default, VBOX Touch will automatically start logging when it detects movement. You can also start or stop logging manually.
You can also control the logging by using an RLVBACS010 hand-held latching trigger switch.
The Logging Status Icon will indicate when the unit is saving data to the SD card.
CAUTION
Do not remove the SD card while the Logging Status Indicator is visible on the VBOX Touch screen.
This indicates that the unit is actively logging and writing data to the SD card. Removing the card during this process may result in data loss or file corruption, and the SD card may need to be repaired before it can be used again.
Always confirm that logging has stopped before removing the SD card.
Before using the unit, make sure that:
- A compatible SD card is inserted.
- The unit has a clear view to the sky or is connected to an external GNSS antenna that has been installed according to best practice.
- The unit is powered from a suitable power supply.
IMPORTANT
- Always stop logging before removing the SD card.
- Wait for a stable satellite signal before starting a test.
- Poor antenna placement can affect accuracy.