VBOX Configuration - 2 Target Vehicles (Moving Base Solution)
- Last updated
-
-
Save as PDF
-
To configure VBOXs within a Subject Vehicle and 2 Target Vehicles using a Moving Base solution for ACC, AEB, BSD or FCW tests, please follow the steps below:
Place one VBOX into each vehicle - one will be the subject vehicle and two will be the target vehicles. Racelogic recommend that the first target vehicle is used as the moving base. This means that the subject vehicle is only receiving the separation and correction data, not both sending and receiving it. This improves the reliability of the data.
Target Vehicle 1
- Connect VBOX Manager to the VBOX in Target Vehicle 1.
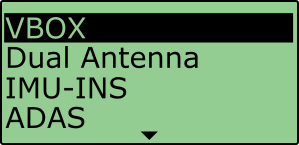
- Enter the 'SETUP' menu of VBOX Manager.
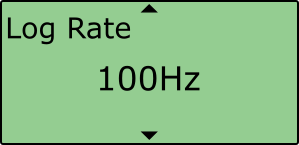
- Select the 'VBOX' option and scroll to 'Log Rate'. Ensure that '100 Hz' is selected, if it is not, select the menu and choose the option.
- Scroll to 'Dynamic Mode', select and then choose one of the following options:
- If you are not using IMU integration, set the dynamic mode to 'Medium' and press to confirm, this Dynamics mode is best for ADAS tests.

- If you are using IMU integration, set the dynamic mode to 'High' and press to confirm.

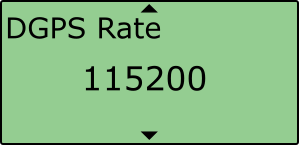
- Scroll to 'DGPS Rate' and ensure that '115200' is selected, if it is not, select the menu and choose the option.
- Scroll to 'DGPS Mode', select and then set to 'MB Base', press to confirm.

- Return to the 'SETUP' menu by selecting 'Back'.

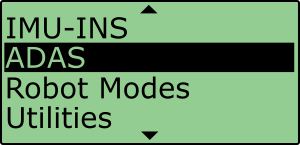
- Select the 'ADAS' option and then choose '2 Target' as the ADAS mode, press to confirm.
- Scroll to 'ADAS Function', select and then choose 'Target 1', press to confirm.

RTK Status Indication
As Target Vehicle 1 effectively becomes the Base Station, it will not physically go into an RTK lock, therefore the 'DIFF' LED of the Target Vehicle 1 VBOX will NOT illuminate. The 'DIFF' LED of the Subject Vehicle and Target Vehicle 2 VBOXs should gain RTK FIXED status indicated by the 'DIFF' LED illuminating green.
Target Vehicle 2
- Connect VBOX Manager to the VBOX in Target Vehicle 2.
- Repeat steps 2 – 5 in section ‘Target Vehicle 1' above.
- Scroll to 'DGPS Mode', select and then set to 'MB Rover', press to confirm.

- Return to the 'SETUP' menu by selecting 'Back'.
- Select the 'ADAS' option and then choose '2 Target' as the ADAS mode, press to confirm.
- Scroll to 'ADAS Function', select and then choose 'Target 2', press to confirm.

Subject Vehicle
- Connect VBOX Manager to the VBOX in the Subject Vehicle.
- Repeat steps 2 – 5 in section ‘Target Vehicle 1' above.
- Scroll to 'DGPS Mode', select and then set to 'MB Rover', press to confirm.
- Return to the 'SETUP' menu by selecting 'Back'.
- Select the 'ADAS' option and then choose '2 Target' as the ADAS mode, press to confirm.
- Scroll to 'ADAS Function', select and then choose 'Subject', press to confirm.